Removing old or damaged window tint from residential or commercial windows can feel overwhelming, especially if it has been on for years. Over time, films can bubble, peel, or discolor, affecting both appearance and function. Whether you want to update your home’s energy efficiency, improve visibility, or replace outdated films with modern, high-performance options, knowing the right methods is essential. This guide explains why removal may be necessary, the safest techniques for tackling stubborn adhesive, and tips for achieving a clean, smooth glass surface without damage. Following these steps ensures efficient and stress-free results for any homeowner.
Why Would You Need to Remove Window Tint from Your Home or Office?
Old window films can lose their effectiveness and visual appeal over time. Homeowners often choose to remove them to restore clarity, improve energy efficiency, or prepare for a new, upgraded tint. Identifying the reasons for removal helps determine the best method and tools to use, ensuring minimal risk to the glass and surrounding surfaces. Removal may be required for cosmetic reasons, performance improvement, or maintenance, and understanding the signs of deterioration allows homeowners to act before more extensive damage occurs. Professional consultation can also help assess whether replacement is preferable to DIY removal in certain cases.
Is the Film Bubbling or Peeling?
One of the most common signs that a window film needs removal is bubbling or peeling, which occurs when moisture, dirt, or air becomes trapped between the glass and adhesive. This can happen after years of exposure to sunlight, temperature changes, or improper installation. Bubbling compromises both aesthetics and functionality, reducing heat rejection and glare control. In many cases, the film cannot be restored once adhesion fails. Attempting to keep a damaged film may lead to further peeling or residue buildup, making removal a more practical and cost-effective option for restoring a clean, smooth surface.
Has the Tint Discolored Over Time?
Window films are subject to yellowing, cloudiness, or fading, especially those installed many years ago. Discoloration can make interiors appear darker or distorted, reducing visibility and affecting natural light. Older dyed films are particularly prone to UV-induced fading, while metalized and lower-quality films may show streaks or corrosion of reflective layers. Removing discolored films not only restores the clarity of your windows but also prepares the surface for modern replacement films with better heat rejection, UV protection, and longevity. This step improves both the look and performance of your windows.
Do You Want to Update Your Home’s Look or Performance?
Many homeowners choose removal to upgrade to advanced window films that provide better heat rejection, glare reduction, and UV protection. Modern films maintain clarity while improving energy efficiency, making homes more comfortable and reducing air-conditioning costs. Replacement films can also enhance privacy and interior aesthetics. For resale purposes, updated, high-quality films can increase property value while offering protection to flooring, furniture, and artwork. Assessing your home’s orientation, sun exposure, and energy goals helps determine whether removal and replacement are worth the investment.
What Are the Best Methods to Remove Window Tint Safely?
Proper removal methods prevent glass scratches, adhesive residue, and safety hazards. Different techniques work best depending on film age, thickness, and adhesive type. Homeowners can choose steamers, heat tools, or chemical solutions to safely loosen films. Using the correct method ensures complete removal without damaging windows or surrounding trim. Each technique requires careful handling, preparation, and sometimes protective equipment. Combining approaches may be necessary for stubborn films, particularly older ones that have baked onto the glass over time.
Using Steamers for Loosening Film
Steam effectively penetrates the adhesive layer, softening it for easy peeling. Homeowners can use commercial window steamers or handheld devices to release film from glass. To use this method safely, ensure the room is well-ventilated and avoid direct contact with the hot steam to prevent burns. Start at one corner, gently lifting the film while applying continuous steam to gradually loosen the adhesive. This method is especially effective for large glass panes or films that have been on the window for many years. Proper control of steam temperature ensures that the glass remains intact and the film peels evenly.
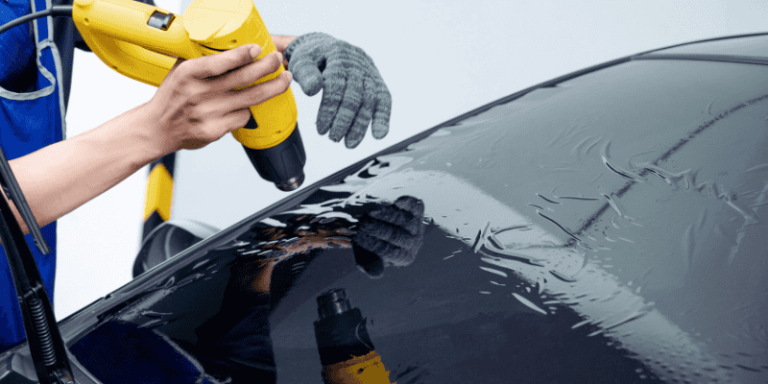
Heat Gun or Hair Dryer Method
Using a heat gun or hair dryer allows controlled softening of the adhesive without excessive moisture. Position the heat source a few inches from the film and move it steadily to warm the surface. Recommended temperatures typically range from 120°F to 150°F to prevent glass cracking or warping. Once the adhesive softens, begin peeling the film slowly from the edges. This method works well for stubborn or baked-on films and can be combined with scraping tools for sticky residues. Careful handling is key to avoiding burns or damaging window seals.
Soapy Water or Ammonia Method
Chemical solutions like soapy water or ammonia help break down adhesive on glass surfaces. Mix a mild dish soap solution or dilute ammonia in water and spray onto the film and edges. Let it sit for a few minutes to penetrate the adhesive. Use a squeegee or plastic scraper to gently lift the film, applying additional solution as needed. Rinse thoroughly with water afterward to remove residue. Always wear gloves and ensure proper ventilation, especially when using ammonia. This method is effective for films that are partially peeling or in areas where heat or steam tools are difficult to use.
How Can You Remove Sticky Residue Left Behind by Window Film?
After peeling off the old tint, a sticky residue often remains on the glass. This residue is the leftover adhesive that held the film in place and can attract dust and dirt if not removed properly. Cleaning it completely ensures your windows stay clear and ready for new film installation. Removing residue requires patience, the right tools, and safe cleaning agents. Homeowners can choose from chemical solvents, mechanical scraping, or mild cleaners based on glass type and location. Avoid harsh abrasives, which can scratch the surface or leave permanent marks.
Solvents for Adhesive Removal
Solvents like rubbing alcohol, white vinegar, or commercial adhesive removers can effectively break down the glue without harming the glass. To apply, soak a microfiber cloth or sponge in the solvent and press it against the residue for a few minutes. This softens the adhesive, making it easier to wipe off. Avoid using harsh chemicals like acetone near window seals or painted frames, as they can cause damage. Commercial products designed for window tint removal, available at hardware stores, provide a safe and efficient option. Always rinse thoroughly with clean water afterward to prevent streaks.
Scraping and Tools
For stubborn glue patches, scraping tools such as plastic scrapers, razor blades, or squeegees can help remove adhesive without damaging the surface. Always hold the blade at a shallow angle (about 30°) and move it in one consistent direction. Spraying a mild soapy solution during scraping prevents scratches and makes residue slide off smoothly. Use plastic tools on delicate glass or coated windows to avoid damage. Once the adhesive is removed, wipe the glass with a microfiber cloth and glass cleaner to achieve a streak-free finish. Proper technique ensures clarity and avoids costly repairs.
Removing Tint in Cold Weather
Cold temperatures can make window tint adhesive harder and more brittle, complicating removal. In winter, it’s best to slightly warm the glass using a heat gun or hair dryer to soften the film before peeling. Keep the room warm, ideally above 60°F, for better results. Steamers can also be helpful, as the moist heat loosens the adhesive without overheating the glass. Always avoid sudden temperature changes, which can crack windows. Taking extra care in winter ensures smooth removal and prevents damage caused by stiff or unyielding adhesive layers.
What Is the Easiest and Most Efficient Way to Remove Window Tint?
The most efficient method combines steam, controlled heat, and adhesive cleaning. Start by loosening the film edges with heat or steam. Gradually peel the tint while maintaining steady warmth on the area being lifted. Once the film is removed, apply rubbing alcohol or soapy water to dissolve the remaining glue. Finish with gentle scraping and a final glass cleaner rinse for complete clarity. For large windows or multilayered films, a dual-step approach using both steam and solvents saves time. Homeowners who prefer guaranteed, damage-free results should consider professional services like OC Tint Solutions give, where experienced technicians use specialized equipment for fast and precise removal.
Safety Tips and Precautions When Removing Window Tint
Removing tint involves working with heat, steam, and chemical solutions, which require safety awareness. Protecting your health and property is as important as achieving clean results. Simple safety measures like wearing protective gear and preparing your workspace can prevent accidents or damage. Always follow manufacturer guidelines for tools and chemicals to avoid injury.
Protect Yourself and Your Workspace
Wear gloves, eye protection, and a face mask to avoid burns, irritation, or chemical exposure. Proper ventilation is essential, especially when using ammonia-based or alcohol-based cleaners. Cover nearby floors, furniture, or window frames with cloths or plastic sheets to prevent spills or drips. Keep electrical devices away from wet surfaces. Taking these precautions helps create a safe working environment and ensures a smooth, stress-free cleaning process without unintended damage.
Professional Assessment for Large or High-Rise Windows
For tall windows, skylights, or large glass panels, professional removal is the safest choice. DIY removal can be risky at heights or with heavy glass panes, as improper handling may lead to cracks or injury. Certified professionals use industrial-grade tools, scaffolding, and safety gear to complete the task quickly and safely. Window tinting Services, such as OC Tint Solutions, ensure precision, reduce the risk of glass damage, and guarantee smooth results, making them ideal for offices, commercial spaces, and multi-story homes.
Frequently Asked Questions (FAQs) About Window Tint Removal
Can old tint be reused after removal?
No, window film cannot be reused once removed. The adhesive loses its bonding ability and structural integrity.
How much does professional removal cost?
Prices typically range from $5 to $10 per square foot, depending on film type, size, and accessibility.
Will removal damage my windows?
If done carefully using the right tools and techniques, removal does not damage glass. Avoid sharp tools or excessive heat.
How long does the process take?
Most residential window tint removal projects take 30 minutes to 2 hours, depending on window size and film condition.
Can I remove film from double-pane or coated windows?
Yes, but extra care is needed. Excessive heat or scraping can damage the coating or compromise insulation between panes.
Conclusion: When to Remove and How to Do It Right
Old, peeling, or faded window films can reduce your home’s comfort and appearance. Knowing how to remove them safely helps restore clarity and prepare your windows for upgraded tints. Whether using steam, heat, or cleaning solutions, following proper techniques ensures smooth results without damage. For large, aged, or hard-to-reach windows, professional help from OC Tint Solutions is highly recommended. Their trained experts handle removal efficiently, restore glass to a clean finish, and can install high-quality replacement films that enhance comfort, privacy, and energy efficiency for your home or business.