Getting your car windows tinted is a smart upgrade that improves comfort, safety, and privacy. But many drivers run into problems soon after installation because they do not follow the correct aftercare steps. Issues such as bubbling, peeling edges, streaking, or fading often appear when maintenance instructions are ignored. Proper aftercare is just as important as choosing the right tint film in the first place.
By following the right do’s and avoiding the most common mistakes, you can extend the life of your tint, protect your investment, and keep your car looking sharp for years. We cover everything you need to know about the best practices, common errors to avoid, and expert tips that will save you from costly repairs or replacements later. Even if you drive daily in the sun, park outdoors, or want your tint to last as long as possible, this checklist-style approach will help you maintain your window film in excellent condition.
Why Window Tint Aftercare Matters
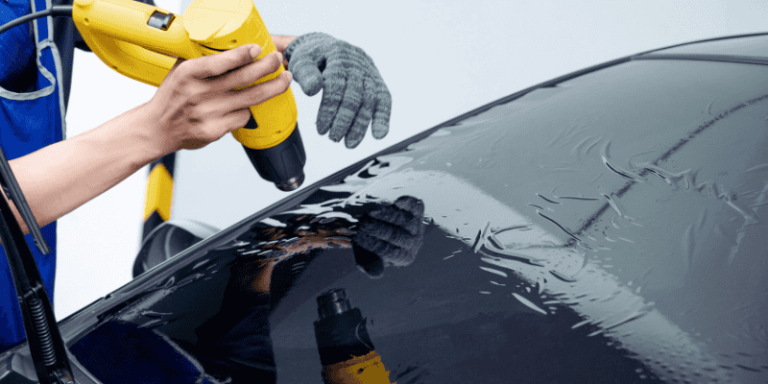
Window tinting works by applying a thin adhesive-backed film to your car’s glass, and the curing process is crucial for durability. When first installed, moisture gets trapped under the film, which can create haziness or tiny bubbles that gradually disappear as the adhesive bonds fully with the glass. This curing phase usually takes several days to a week, depending on weather conditions. If the tint is disturbed during this period, by rolling down windows, washing the car, or using the wrong cleaners, it can peel, bubble, or even void the installer’s warranty.
Good aftercare ensures the tint’s longevity. High-quality films are designed to last 10–15 years if maintained properly, but neglect or misuse can cut that lifespan in half. Correct care also preserves important benefits like UV protection, glare reduction, and interior temperature control. On the other hand, poor maintenance often leads to discoloration, scratches, or adhesive failure, which reduces both function and appearance. For drivers, understanding the importance of tint aftercare means avoiding repeat expenses, staying compliant with warranty terms, and ensuring that your vehicle always looks and performs its best.
Do’s: Best Practices for Caring for Tinted Car Windows
Wait Before Rolling Down Windows
After tinting, it is crucial to let the film cure fully before rolling down your windows. The curing period usually ranges from 2 to 7 days, depending on the climate and the type of film used. Hot and dry weather speeds up the drying process, while cold or humid conditions can slow it down. If you roll down the window too early, the edges of the film may peel away from the glass or create permanent creases that cannot be fixed. By waiting the recommended time, you allow the adhesive to bond securely, ensuring your tint looks smooth and lasts longer. Always ask your installer for specific drying guidelines, as premium films may have slightly different curing times.
Clean With Care and Use the Right Products
Cleaning tinted windows requires gentle methods and the right supplies. Always use ammonia-free cleaners, as ammonia breaks down adhesives and causes tint to discolor over time. A mild soap and water solution, paired with a microfiber cloth, is ideal for streak-free cleaning. Avoid paper towels or abrasive sponges, as they can scratch the film’s surface. When cleaning, spray the solution onto the cloth instead of directly onto the glass to prevent excess moisture from seeping into the film’s edges. By sticking to gentle products and techniques, you preserve both the appearance and performance of your tint while avoiding premature wear.
Follow the Installer’s Aftercare Instructions
Every tinting brand and film type may have unique care instructions, so always follow your installer’s recommendations. Premium films like ceramic or crystalline may have specific curing times, cleaning guidelines, or warranty requirements. Ignoring these instructions could void your warranty and reduce the lifespan of your tint. For example, some installers advise avoiding rear window defrosters or strong cleaning chemicals during the first few weeks. Compliance with these guidelines protects your investment, ensures your warranty remains valid, and shows that you are maintaining the film as intended. Think of these instructions as an owner’s manual for your window tint.
Park Smart and Protect From Heat
Parking choices play a major role in preserving your tint. Extended exposure to direct sunlight accelerates wear, causes fading, and weakens adhesives. Whenever possible, park in the shade, use a garage, or place sunshades inside your windshield. This not only keeps your tint in better condition but also helps regulate cabin temperature, making your car more comfortable on hot days. In regions with extreme heat, parking smart can extend the life of your tint by years. If shade is limited, investing in windshield protectors or ceramic films with high heat rejection can provide added protection against damage from long-term sun exposure.
Check for Issues Early
It’s normal to notice small bubbles or haze in the days following installation, as moisture evaporates during curing. However, if these problems persist beyond a week or if edges start lifting, it could indicate an installation issue. Checking for problems early allows you to return to your installer for adjustments before the damage spreads. Other warning signs include purple discoloration, peeling corners, or unusual streaks after cleaning. Reputable installers often offer a warranty, so reporting concerns quickly ensures you remain covered. Addressing small issues early prevents larger repairs later and helps you enjoy the full benefits of your tint without interruptions.
Don’ts: Common Mistakes to Avoid With Tinted Windows
Don’t Wash Your Car Too Soon
A fresh tint needs time to set, and washing your car too early can ruin the film. It’s best to wait at least 5 to 7 days before the first wash, depending on weather conditions. High-pressure water, automated brushes, or aggressive scrubbing can lift edges, trap moisture, or create bubbles under the film. Once the curing process is complete, you can wash your car normally, but even then, be cautious around window edges. Hand washing is the safest option for preserving both your paint and your tint.
Avoid Harsh Chemicals and Abrasives
Household glass cleaners often contain ammonia, vinegar, or alcohol, which can damage the tint’s adhesive and cause discoloration. Instead, always stick to ammonia-free cleaners. Just as important, avoid tools like razor blades, scrub pads, or rough sponges. These can scratch the film’s surface permanently. Even though tint appears durable, it’s still a thin layer of film that requires gentle care. Protecting your tint from chemicals and abrasives ensures that it retains clarity, UV protection, and overall quality for the long run.
Don’t Attempt DIY Fixes
When problems like peeling or bubbling occur, it can be tempting to fix them yourself. However, DIY attempts often cause more harm than good. Pulling at edges can damage the adhesive and worsen the peeling, while poking at bubbles may leave permanent marks. If your tint develops issues, always return to your installer for repair or replacement. Professionals have the right tools and experience to handle these situations without damaging the film or glass. Choosing not to attempt DIY fixes preserves both your investment and your warranty coverage.
Don’t Ignore Tint Laws
Every region has its own legal limits for window tint darkness, known as VLT (Visible Light Transmission). Installing tints that are too dark can result in fines, tickets, or required removal. For example, in California, front side windows must allow more than 70% of light, while rear windows can be darker. Using an illegal tint not only risks penalties but can also void warranties if installers require compliance. Always check your local tint laws before choosing a film, and consult your installer to ensure your tint remains legal.
Troubleshooting Common Tint Problems
- Bubbles vs. Moisture Pockets: Small moisture pockets are normal during curing and should disappear within a week. Persistent bubbles, however, signal poor installation.
- Edges Peeling or Lifting: This occurs when the adhesive is weak or the tint was disturbed too early. A professional can reapply or reseal affected areas.
- Tint Turning Purple or Fading: Usually caused by low-quality dyed films. Upgrading to carbon or ceramic tint solves this issue.
- Scratches and Streaks: Often the result of abrasive cleaning tools or harsh chemicals. Switching to microfiber cloths prevents further damage.
By knowing how to identify these problems, you can separate normal curing effects from actual damage and act quickly when repairs are needed.
Long-Term Maintenance and Protection Tips
Caring for tinted windows is not just about the first week after installation. Long-term habits make the biggest difference in extending your tint’s lifespan. Clean your windows every two to three weeks with a mild, ammonia-free solution and microfiber cloth. Protect your car’s interior with sunshades, dash covers, or UV sprays, especially if you live in areas with intense sunlight. Seasonal care is also important, avoid scraping ice directly on tinted glass during winter, and be cautious about heat stress during summer.
Routine maintenance also helps keep your warranty valid. Many installers provide lifetime warranties against fading or bubbling, but they require proof of proper care. Following these steps ensures you get the full benefits of your investment and enjoy a tint that looks sharp and performs well for years.
Why Choose OC Tint Solutions for Your Window Tinting Needs
At OC Tint Solutions, we specialize in high-quality tint installations that combine performance, durability, and style. Our technicians use advanced films, including ceramic and carbon options, that block up to 99% of UV rays and significantly reduce interior heat. Every installation is done with precision to ensure a flawless finish that lasts for years.
We also provide warranty-backed films and guide you through proper aftercare so you get the most out of your investment. Customers in Anaheim and Costa Mesa trust us because we understand the unique climate challenges of Southern California and install films that perform exceptionally in hot, sunny conditions.
What sets us apart is our commitment to service. From explaining your film options to offering clear aftercare instructions, we make the tinting process stress-free. With excellent reviews and a track record of satisfied clients, OC Tint Solutions is the trusted choice for drivers who want comfort, protection, and quality. Contact us today for a free consultation or quote, and let us help you upgrade your driving experience
Final Thoughts and Checklist for Drivers
Proper aftercare is the difference between window tint that lasts years and tint that fails within months. By following the do’s, such as waiting for curing, using the right cleaners, and parking smart, you protect your investment. At the same time, avoiding the don’ts, like washing too soon, using harsh chemicals, or attempting DIY fixes, saves you from costly repairs. With just a little attention, your tint can keep blocking heat, protecting your skin, and improving your car’s look for a decade or more.
Quick Checklist for Drivers:
- ✅ Wait 2–7 days before rolling down windows
- ✅ Wait 5–7 days before washing your car
- ✅ Use ammonia-free cleaners and microfiber cloths
- ✅ Park in shade or use sunshades when possible
- ✅ Inspect tint regularly for bubbles or peeling
- ❌ Don’t use harsh chemicals or rough tools
- ❌ Don’t attempt DIY fixes for bubbles or peeling
- ❌ Don’t ignore local tint laws
Keep this checklist handy during the first few weeks and continue using it as part of your car care routine.