Air bubbles in window tint are one of the most common concerns after a fresh installation on car, home, or office glass. Many people think bubbles always mean something went wrong, but that is not always true. Some bubbles are part of the natural curing process, while others indicate installation errors or film-quality issues. In Orange County areas like Anaheim and Costa Mesa, strong sunlight and heat can speed up curing but also make bubbles more visible in the first few days. The key is understanding whether the bubbles are temporary or permanent, so the right action can be taken without unnecessary re-tinting.
Window Tint Bubble Types and What Each One Indicates
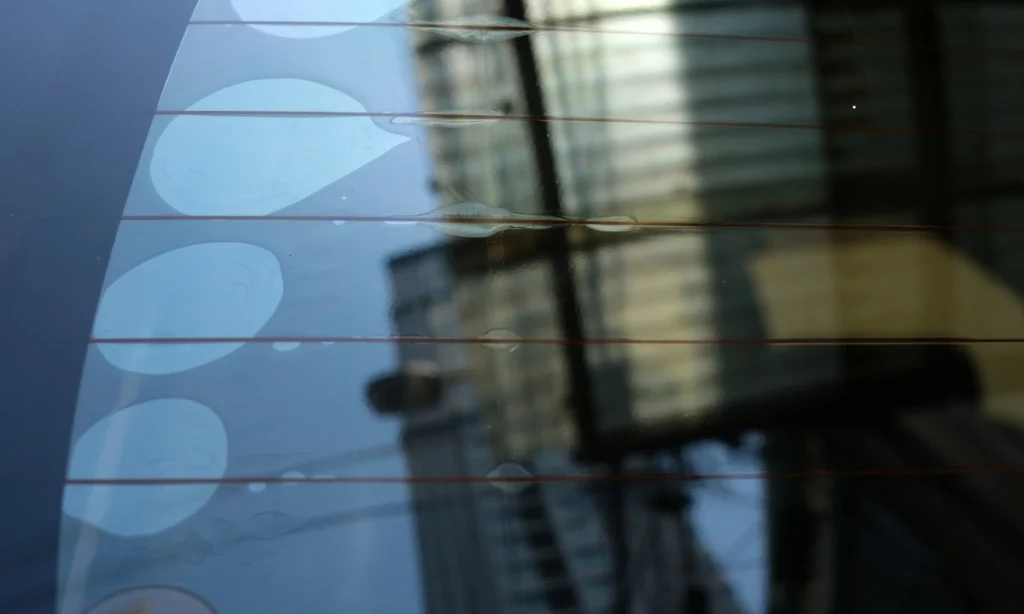
Moisture bubbles during the curing process
Moisture bubbles are the most common type seen right after installation. They form because the slip solution used during installation (a mix of water and soap) gets trapped between the glass and the film. As the tint begins to cure, this moisture slowly evaporates through the film edges. These bubbles usually look cloudy or watery and may shift slightly in shape during the first few days. In most cases, they are temporary and disappear once the curing process is complete.
Air pockets from installation errors
Air pockets happen when the film is not properly pressed against the glass during installation. This can occur if the squeegee pressure is uneven or if the installer misses sections while smoothing the film. Unlike moisture bubbles, air pockets do not naturally go away because no liquid is involved. They stay trapped under the film and often appear as small, round, or stretched shapes. These usually require manual correction or full reinstallation, depending on severity.
Dust or contamination bubbles
These bubbles are caused by tiny particles like dust, lint, or dirt that get trapped between the glass and the film before installation. Even microscopic debris can create raised points that remain visible after installation. These are permanent because the adhesive locks the contamination in place. The only proper fix is removing the film, cleaning the glass again, and reinstalling a fresh layer.
Edge lifting and separation bubbles
Edge bubbles appear near the borders of the window where the film meets the glass frame. They are usually caused by weak adhesive bonding, improper trimming, or exposure to heat and moisture over time. These bubbles often start small but can spread inward if ignored. In many cases, they are an early sign of peeling and may require edge resealing or full replacement.
Core Causes of Window Tint Bubbles
Poor surface preparation before installation
Proper surface cleaning is one of the most important steps before applying window tint. Any oil, dust, or residue left on the glass creates a barrier between the adhesive and the surface. This leads to weak bonding and trapped air pockets during installation. Even invisible contamination can cause visible bubbling later, which is why deep cleaning is essential before film application.
Installation technique errors
Many bubble problems come from installation mistakes rather than film quality. Common errors include uneven squeegee pressure, trapped slip solution, misaligned film placement, and rushing through the application process. If the film is not properly smoothed from the center outward, air and liquid become trapped underneath. These issues directly affect how well the adhesive bonds to the glass and often determine whether bubbles appear later.
Low-quality tint film or a weak adhesive layer
Film quality plays a major role in long-term performance. Low-grade dyed films often have weaker adhesive systems that break down faster under heat and sunlight exposure. Over time, this leads to bubbling, peeling, and color fading. Higher-quality carbon and ceramic films use stronger adhesive layers that bond more evenly and resist environmental stress much better.
Environmental impact during curing
Weather conditions strongly influence how window tint cures. High heat can speed up drying but also stress weaker adhesives, while humidity slows down evaporation of trapped moisture. Dust in the air can also settle on adhesive edges during installation. In regions with strong sun exposure like Southern California, these factors make professional installation even more important for long-term stability.
Glass curvature and installation difficulty
Not all glass surfaces are flat, and curved or angled windows require more skill during installation. These shapes often need heat-shrinking techniques to properly fit the film without wrinkles or air gaps. If the film is not shaped correctly, air pockets can get trapped in tight curves or edges, leading to visible bubbling after installation.
Window Tint Materials and Their Impact on Bubble Formation
Dyed window tint film
Dyed films are the most budget-friendly option, but also the most prone to bubbling over time. They rely on a basic adhesive system and are more likely to degrade under UV exposure and heat. As the adhesive weakens, small bubbles and fading often appear, especially on vehicles or glass exposed to direct sunlight.
Carbon window tint film
Carbon films offer better durability and heat resistance compared to dyed options. The carbon layer improves stability, reduces fading, and strengthens adhesion. These films are less likely to bubble under normal conditions and maintain a more consistent appearance over time.
Ceramic window tint film
Ceramic films are considered the premium option for both performance and durability. They provide strong UV rejection, excellent heat control, and superior adhesive bonding. When installed correctly, ceramic films show minimal risk of bubbling and maintain clarity for a much longer period, even in harsh sun conditions.
Factory-tinted glass vs aftermarket film
Factory-tinted glass has color built directly into the glass itself, meaning it cannot bubble or peel. In contrast, aftermarket window film relies on adhesive bonding to the surface. This makes installation quality extremely important because any error in the application can lead to bubbling, peeling, or contamination issues over time.
How Long Window Tint Bubbles Take to Disappear
Normal curing timeline
After a fresh installation, many bubbles seen on the window tint are part of the curing process. These are usually moisture-based and slowly disappear as water evaporates through the film. The timeline depends heavily on weather conditions and sunlight exposure. In warm climates, curing happens faster because heat speeds up evaporation, while cooler or shaded environments slow it down. Most installations follow this pattern:
- 3–7 days in warm conditions
- 1–3 weeks in moderate climates
- up to 4 weeks in humid or cold weather
During this period, bubbles may shift, shrink, or look uneven before fully clearing out.
Bubbles that will not disappear
Not all bubbles are temporary. Some are permanent and will remain no matter how long the film cures. These usually come from installation or material problems rather than trapped moisture. Common causes include:
- dust contamination trapped under the film
- adhesive failure or weak bonding
- poor installation technique
- aging or low-quality film breakdown
If bubbles stay visible after the curing period, they will not resolve on their own and require corrective action.
Factors affecting curing speed
Several conditions influence how quickly window tint bubbles disappear. These include:
- temperature exposure: higher heat speeds up curing
- Sunlight intensity: Direct sun helps moisture evaporate faster
- film type: ceramic films cure more evenly than dyed films
- glass thickness: Thicker glass can slow heat transfer and curing
These factors explain why the same film may cure faster on one window and slower on another.
Safe Methods to Fix Window Tint Bubbles
Heat-assisted correction
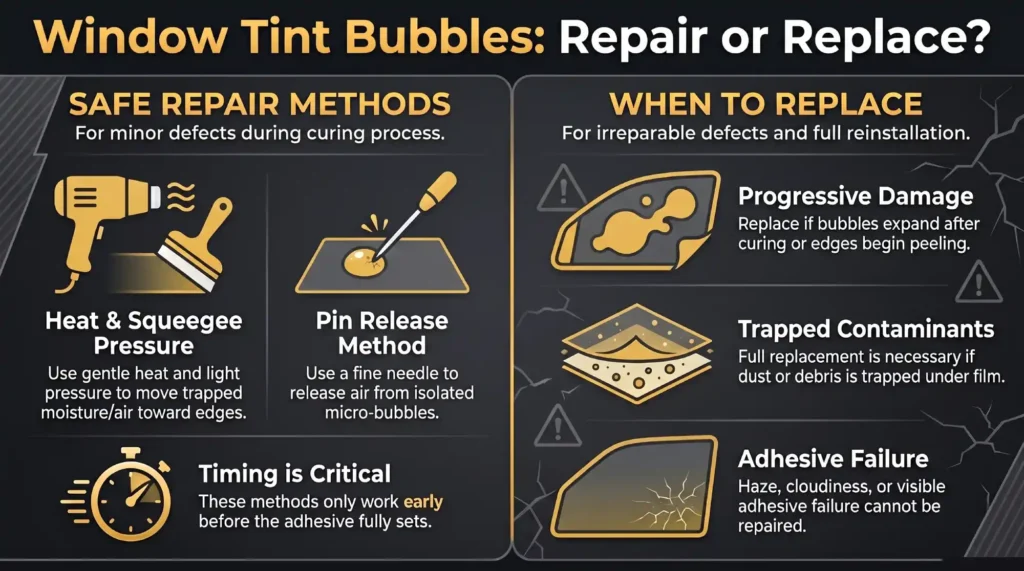
Gentle heat can help small moisture bubbles escape during early curing stages. This method works by loosening trapped water so it can evaporate through the film edges. It must be controlled carefully, since excessive heat can weaken adhesive bonding and worsen the issue instead of fixing it.
Squeegee pressure adjustment
If the film is still fresh and flexible, light pressure using a squeegee can help push trapped air or solution toward the edges. This method is only effective shortly after installation. Once the adhesive starts setting, pressure correction becomes less effective.
Pin release method for micro bubbles
A fine needle can be used to release trapped air in very small bubbles. This creates a controlled exit point for air without damaging the surrounding film. However, improper use can leave visible marks or create larger defects, so it should be used with caution and only on minor bubbles.
Full reinstallation for severe cases
When bubbles are widespread, permanent, or caused by adhesive failure, full removal and reinstallation becomes necessary. This ensures the glass is properly cleaned again and a fresh film is applied with correct bonding. It is the only reliable fix for severe bubbling issues.
When Window Tint Needs Replacement Instead of Repair
Re-tinting becomes the only solution when bubble issues go beyond surface-level defects. Replacement is required when:
- bubbles continue expanding after curing
- haze or cloudiness spreads across the glass
- edges begin lifting or peeling
- dust or debris is permanently trapped under the film
- Adhesive failure is clearly visible
At this stage, repair attempts will not restore clarity, adhesion strength, or visual quality. A fresh installation is the only way to regain proper performance.
How to Prevent Window Tint Bubbles
Preventing bubbles is always easier than fixing them later. Most bubbling problems come from installation conditions, surface prep, or film quality rather than random issues. A clean process from the start helps the tint bond evenly and stay clear for years.
Proper glass cleaning before installation
Clean glass is the most important step before applying window tint. Even a thin layer of dust, oil from fingers, cleaning residue, or road film can break the bond between adhesive and glass. When that bond is weak, air and moisture get trapped, leading to visible bubbles after installation.
A proper cleaning process usually involves more than a quick wipe. The glass needs deep cleaning using a safe glass cleaner and lint-free microfiber towels. Corners, edges, and rubber seals should also be cleaned carefully because dust often collects in those areas. After cleaning, the surface should be completely dry and free from streaks before any film touches it.
In high-dust environments like Southern California roads, even a small amount of airborne debris during installation can affect results. That’s why clean glass preparation is treated as a critical step, not a quick task.
Controlled installation environment
The environment where tint is installed has a direct impact on bubble formation. Open-air or dusty conditions increase the chances of particles getting trapped under the film during application. Once trapped, these particles create permanent raised spots or air pockets.
A controlled space reduces these risks significantly. A shaded area helps prevent fast drying of slip solution, while also keeping the glass temperature stable. Wind protection is equally important because moving air can carry dust onto the adhesive surface during installation.
Temperature also plays a role. Extremely hot surfaces can cause the adhesive to set too quickly, leaving no time to properly smooth out air and moisture. On the other hand, overly cold conditions slow down adhesion and curing. A balanced environment gives the installer enough working time to achieve a clean finish.
Professional-grade installation techniques
Even with perfect materials and clean glass, the installation technique determines the final quality. Proper handling ensures that the film bonds evenly without trapping air or solution underneath. One key method is heat-shrinking for curved or angled glass. This process allows the film to match the shape of the window without wrinkles or tension points that can trap air. Another important step is controlled squeegee pressure. Too much force can damage the film, while too little leaves moisture and air behind.
Alignment also matters. If the film is placed incorrectly at the start, adjustments can trap air along edges. Professionals use precise positioning techniques to avoid repositioning after contact with the glass. When these steps are done correctly, the result is a smooth, uniform surface with minimal risk of bubbles forming later during curing.
High-quality film selection
The type of window film used has a strong impact on long-term bubble resistance. Low-grade dyed films often rely on weaker adhesives that break down faster under heat and UV exposure. Over time, this leads to bubbling, fading, and peeling. Carbon and ceramic films perform much better because they use advanced adhesive systems designed for stronger bonding. These films also handle heat more effectively, which reduces expansion and contraction that can create stress points under the surface.
In high-sun regions like Anaheim and Costa Mesa, ceramic films are especially effective because they maintain stability even under constant UV exposure. This helps prevent micro-bubbles from forming and keeps the glass looking clean for a longer period. Choosing a higher-quality film also improves curing behavior. Moisture escapes more evenly, and adhesion settles more consistently, which lowers the chance of post-installation bubbling.
DIY Window Tint Repair vs Professional Service
DIY repair limitations
DIY bubble repair usually works only in very limited situations. It may help with small moisture bubbles that appear during early curing or minor air pockets caused right after installation. These issues are still soft and flexible, so light heat or gentle smoothing can sometimes improve the appearance. While DIY car window tinting might seem like an interesting option, getting in touch with professionals regarding car window tinting is necessary.
However, the risk increases quickly if the problem is not minor. Once tint has started curing or if bubbles are caused by dust, adhesive failure, or poor installation, DIY methods can easily make things worse. Poking, pressing too hard, or applying uneven heat can damage the adhesive layer and leave permanent marks. In many cases, what starts as a small fix attempt ends up requiring full film replacement.
Professional repair advantages
Professional tint repair like OC Tint Solutions focuses on identifying the exact cause of the bubbling before any correction is made. This matters because different bubble types require different solutions. Moisture issues, contamination problems, and adhesive failures are all treated differently rather than using a single method.
A professional service ensures:
- correct removal of trapped air or damaged film
- clean edge sealing to prevent future lifting
- proper surface preparation before any reapplication
- stable long-term adhesion after repair
Another important benefit is consistency. Instead of patching visible spots, the entire window section is evaluated for hidden defects. This reduces the chance of bubbles returning later and helps maintain a uniform finish across all glass surfaces.
Stop Window Tint Bubbles from Ruining Your Glass
Book Professional Tint ServiceCommon Mistakes That Make Tint Bubbles Worse
Poking large bubbles incorrectly
One of the most common mistakes is trying to fix large bubbles by poking them with sharp objects. While this may release a small amount of air, it often creates permanent damage in the film. The puncture marks remain visible and can spread if the adhesive layer is already weak. In many cases, this method turns a repairable issue into a full replacement job.
Overheating during early curing
Applying too much heat too early can weaken the adhesive bond before it fully sets. Instead of helping bubbles disappear, excessive heat can cause the film to lift or shrink unevenly. This leads to long-term adhesion failure and may cause new bubbles to form over time.
Premature cleaning of the new tint
Newly installed tint needs time to cure properly. Cleaning it too early with pressure, chemicals, or rough wiping can disturb the adhesive layer. This interrupts the curing process and often introduces new air pockets or moisture spots. Light care is required during the early curing period to maintain smooth results.
Environmental Factors That Affect Tint Performance
Sunlight and heat exposure
Sunlight plays a dual role in tint performance. Moderate heat helps speed up curing by evaporating trapped moisture, which reduces temporary bubbles. However, excessive heat—especially on lower-quality films—can stress the adhesive layer and lead to uneven bonding or long-term bubbling.
Humidity and moisture levels
Humidity slows down evaporation inside the film layer. When moisture cannot escape quickly, bubbles may appear more visible during the early curing phase. In most cases, these are temporary, but high humidity can extend the curing period and delay full clarity.
Dust and air contamination during installation
Airborne dust is one of the biggest causes of permanent bubble defects. Even tiny particles can get trapped between the film and glass, creating raised points that never disappear. This is why controlled installation environments and proper cleaning are critical for long-lasting results.
Frequently Asked Questions
Why do I have air bubbles in my window tint?
Air bubbles usually form due to trapped air, leftover moisture, dust contamination, or installation mistakes. They are most common right after installation.
Will window tint bubbles go away on their own?
Moisture bubbles often disappear during curing, but air or dust-related bubbles stay permanently unless the film is repaired or replaced.
How long does window tint take to fully cure?
Most window films take about 1 to 4 weeks to fully cure depending on weather conditions, sunlight exposure, and film type.
Can heat remove tint bubbles?
Heat can help moisture escape in early stages, but it cannot fix dust contamination or adhesive failure issues.
Is bubbled window tint repairable?
Small, early-stage bubbles can sometimes be corrected, but most long-term or contamination-based bubbles require reinstallation.
Final Takeaway: What Air Bubbles Really Indicate
Air bubbles are not always a sign of failure. Some are temporary and part of the curing process, while others indicate deeper issues like contamination or weak adhesion. The key is observing whether the bubbles shrink over time or remain unchanged.
Long-term clarity depends on three main factors: proper installation, high-quality film, and controlled application conditions. When these are handled correctly, window tint maintains a smooth, clear finish and delivers consistent performance without bubbling issues.